
With the advancement of web technologies, the HTTP/2 network protocol stands out as a significant upgrade over its predecessor, HTTP/1.x. Its primary goals are to enhance web performance, reduce latency, and make online communications more secure and efficient. Thanks to these improvements, websites load faster, providing a smoother user experience. However, it’s not all smooth sailing. Sometimes, you might run into the ERR_HTTP2_PROTOCOL_ERROR, a roadblock that stops you from accessing certain web pages.
At its core, this error message is a sign that there’s a problem in the communication between your browser and the server hosting the website you’re trying to visit. This can be frustrating, especially when you’re in the middle of important online activities. But worry not, as this guide will walk you through the causes of this error and various strategies to resolve it.
The root causes of ERR_HTTP2_PROTOCOL_ERROR
Identifying the causes of the ERR_HTTP2_PROTOCOL_ERROR is the first step towards resolving it. Here’s a breakdown of the main causes:
Outdated software
One of the primary reasons you might encounter this error is due to outdated software on your device. Whether it’s your operating system or the web browser you’re using, if it’s not up to date, it may lack the necessary support for the latest web standards, including HTTP/2. This lack of support can lead to an inability to correctly parse data packets from the site you’re trying to access, resulting in the ERR_HTTP2_PROTOCOL_ERROR.
Corrupted browser cache
Your browser’s cache plays a crucial role in speeding up website loading times by storing copies of previously visited sites. However, when this cached data becomes corrupted, it can lead to authentication issues. If a website cannot verify the legitimacy of your device due to corrupted cache or cookies, the server may refuse to establish a connection, leading to this error.
Conflicting browser extensions
Browser extensions enhance your browsing experience by adding additional functionalities. Nonetheless, they can sometimes interfere with how websites load and interact with your browser. Certain extensions might block or alter the communication between your device and the website’s server, preventing the site from rendering correctly and causing the ERR_HTTP2_PROTOCOL_ERROR.
Third-party antivirus or firewall software
While antivirus and firewall software are essential for securing your online activities, they can occasionally be overzealous. Some security programs might block your access to specific websites or interfere with the HTTP/2 protocol, mistaking legitimate web traffic for potential threats. This overprotective behavior can result in the aforementioned error.
Server configuration problems
Web servers are the other half of the internet equation, serving content in response to browser requests. Proper configuration for HTTP/2 is critical, particularly regarding SSL/TLS settings. HTTP/2 requires a secure environment to operate, making SSL/TLS not just an option but a necessity. Misconfigurations here can disrupt the delicate dance between server and browser, causing the ERR_HTTP2_PROTOCOL_ERROR.
Website coding errors
Lastly, the way a website is coded plays a significant role in its compatibility with HTTP/2. Coding practices that don’t account for HTTP/2’s requirements or improperly implement its features can cause errors. This includes incorrect use of headers or failing to follow protocol-specific optimizations. Such mistakes can lead to the ERR_HTTP2_PROTOCOL_ERROR, as the browser struggles to process the site’s content under HTTP/2’s rules.
Fixing the ERR_HTTP2_PROTOCOL_ERROR: Browser-based solutions
Before we jump into the more complex solutions, let’s not overlook the simple ones that might just do the trick:
Refreshing the web page: Sometimes, a quick refresh (F5 or Ctrl+R) is all it takes. This sends a new request to the server, which might have just had a temporary hiccup.
Try a different browser: It’s possible the issue is isolated to the browser you’re using. Switching browsers can help determine if the problem is browser-specific.
Reduce your tabs: Too many open tabs can hog your resources and potentially lead to errors. Try closing some tabs to see if it alleviates the issue.
Update your browser
A surprisingly common reason behind the ERR_HTTP2_PROTOCOL_ERROR is an outdated browser. Browsers are continually updated to comply with the latest web standards, including the HTTP/2 protocol. An older version might struggle to communicate effectively with servers using the latest technologies, leading to this error.
Modern web applications and sites are designed to operate under current protocols and standards. When your browser is out of date, it lacks the latest features and fixes that ensure smooth communication with these websites. By updating your browser, you’re essentially ensuring that its language aligns with that of the websites you’re visiting, thereby reducing the likelihood of encountering compatibility issues like the ERR_HTTP2_PROTOCOL_ERROR.
Google Chrome
- Click the three-dot icon in the upper right-hand corner of the browser.
- Look for Update Google Chrome. If you see it, click it. If not, your browser is already up to date.
- To manually check, go to Help > About Google Chrome. Chrome will automatically check for updates and install any found. Restart Chrome to complete the update.
Google Chrome (Mobile)
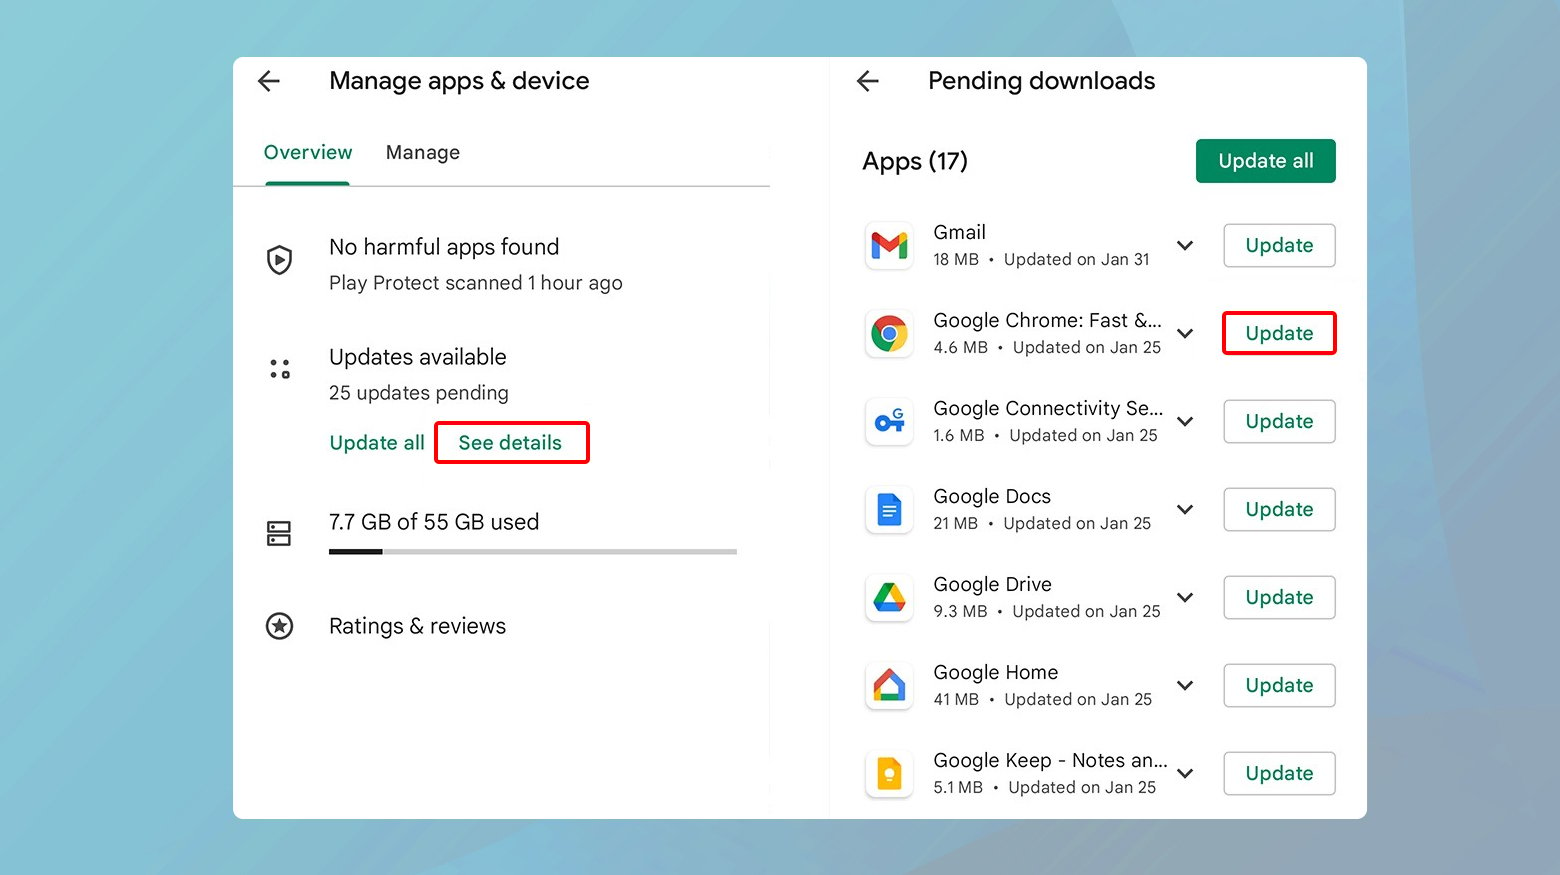
- Open the App Store (iOS) or Play Store (Android).
- Search for Google Chrome.
- If an update is available, you’ll see an Update button. Tap it to update the app.
Clear browsing data
Clearing your cache, cookies, and browsing history does more than just free up some space on your computer. It essentially gives you a fresh start by removing outdated or corrupted data that might be causing issues with how web pages load and function. This is particularly relevant when dealing with errors during the rendering process, as outdated cache files can prevent websites from loading their latest version.
Google Chrome
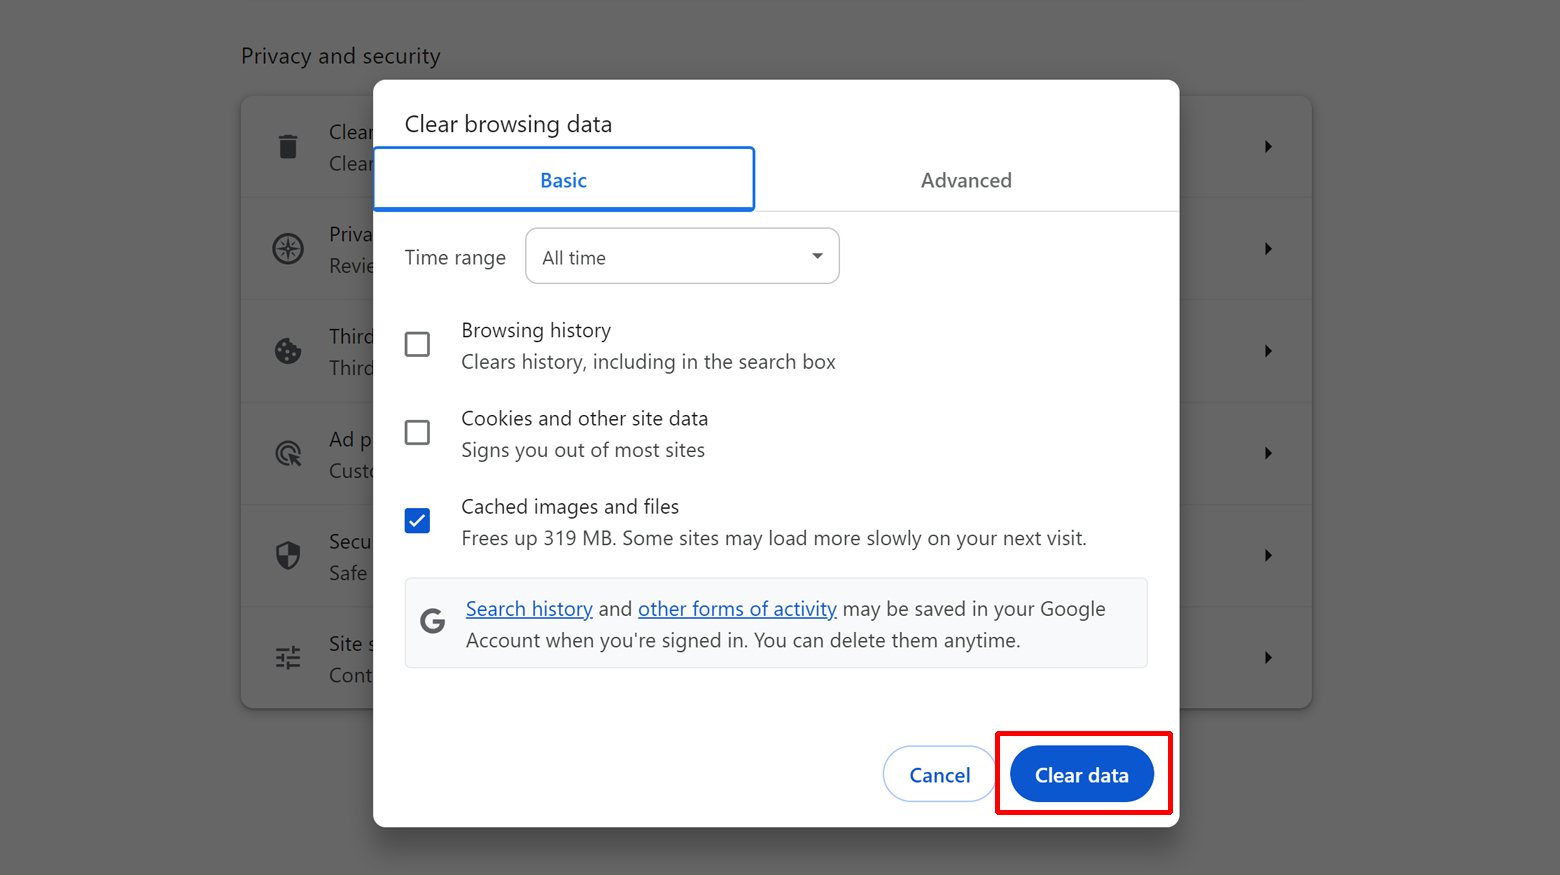
- Click on the three dots in the upper right corner of your browser to access the menu.
- Navigate to More Tools and select Clear Browsing Data.
- In the pop-up window, you’ll see various options. Ensure Cached images and files is selected. You may also choose to clear your browsing history, cookies, and other site data.
- After selecting what you want to clear, click on the Clear data button.
Safari
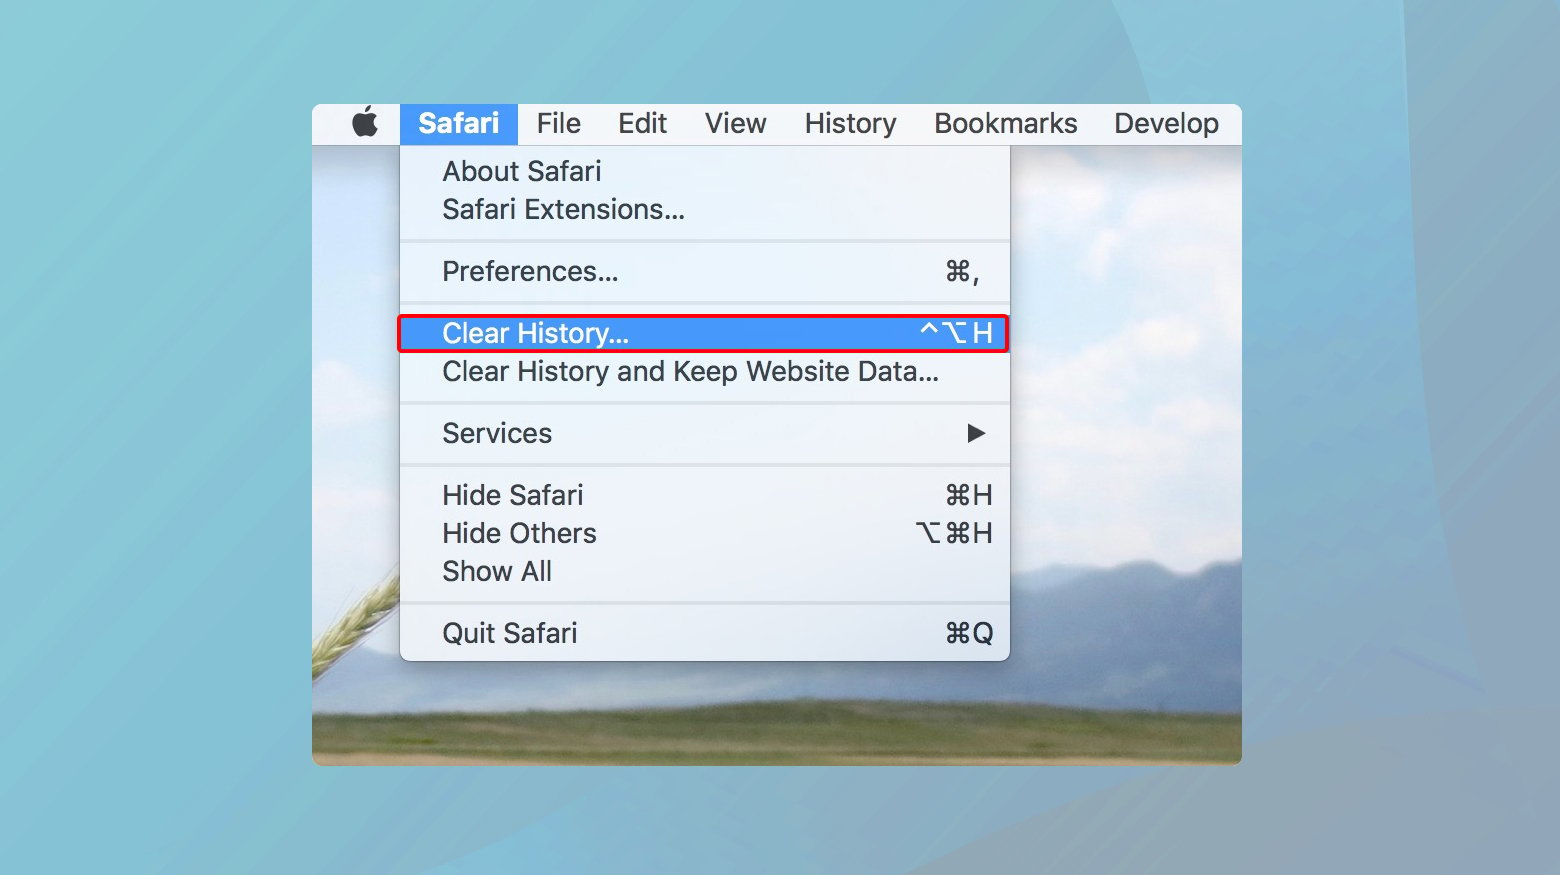
- Open Safari and go to Safari in the menu bar at the top.
- Select Clear History. Here, you can choose how far back you want to clear your history, which also includes your cache, cookies, and site data.
- Click on Clear History to complete the action.
Mozilla Firefox
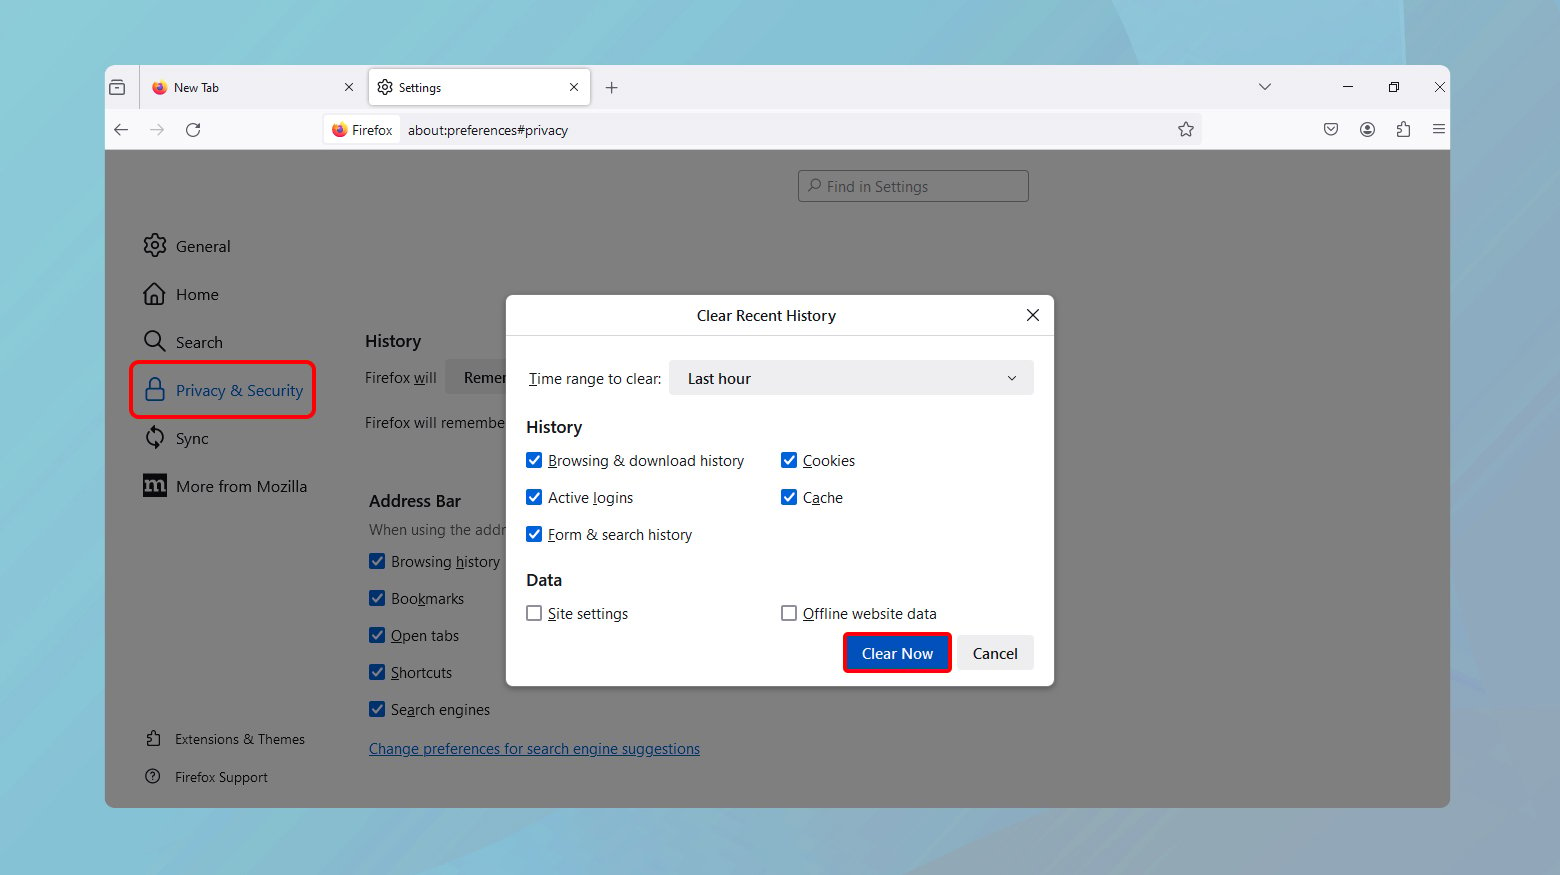
- Click on the hamburger icon (three horizontal lines) in the upper right corner.
- Select History and then Clear Recent History.
- A new window will appear where you can choose the time range to clear and precisely what data to remove. Make sure to check the box for Cache.
- Hit Clear Now to finalize the process.
After clearing your browser data, attempt to revisit the website where you encountered the err_http2_protocol_error. If the issue remains unresolved, this suggests the problem may not be entirely on your end or could be more complex than initially thought.
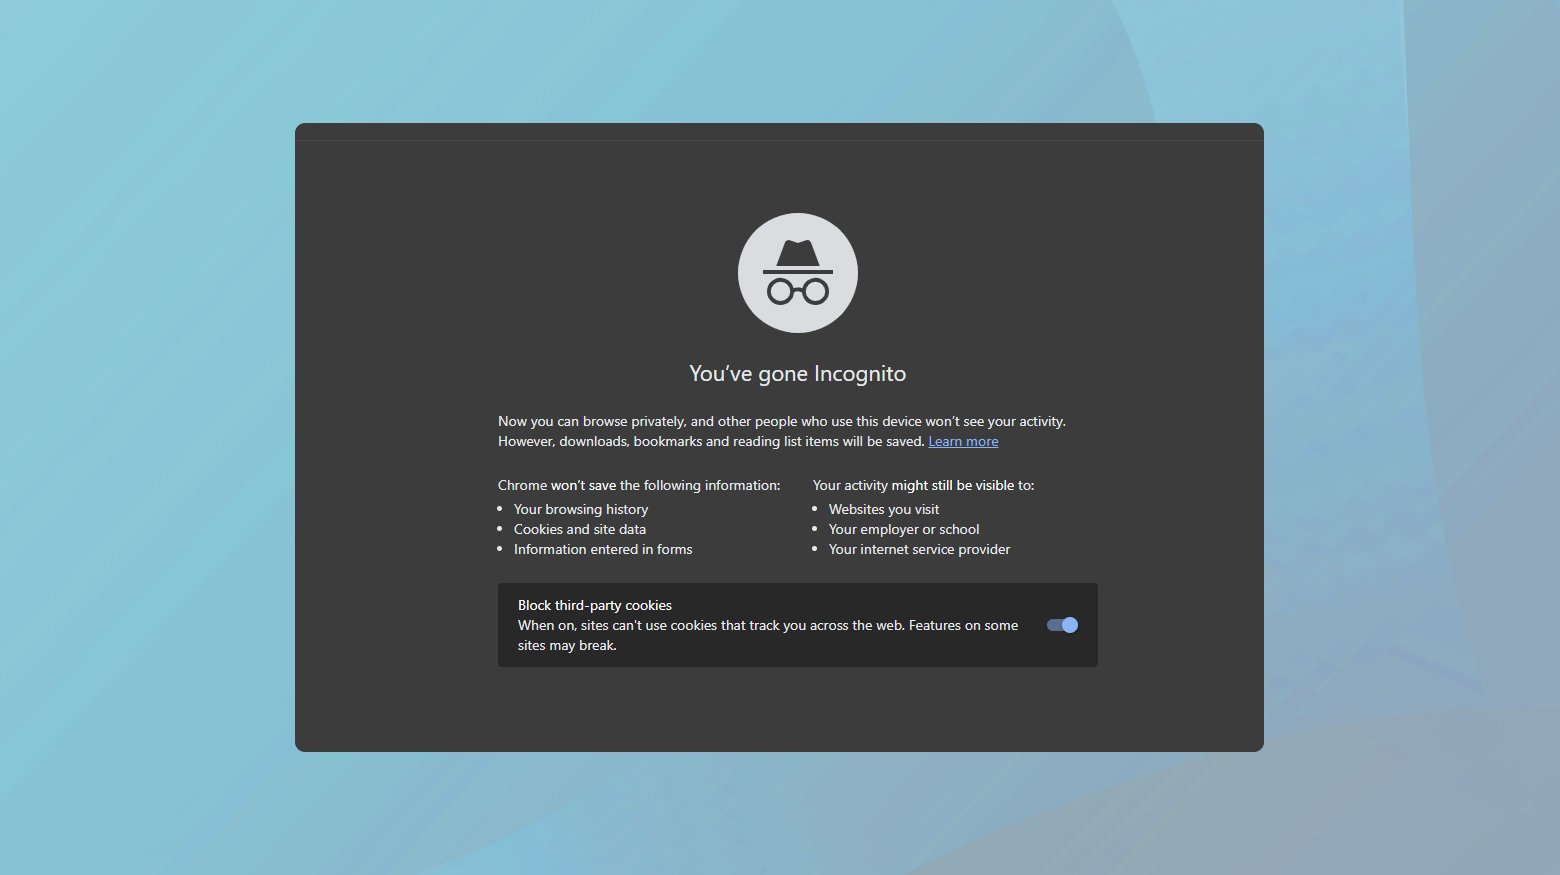
Try incognito mode
Incognito or private browsing mode is a feature found in most modern browsers that allows you to browse the internet without your browser saving any information about which sites and pages you’ve visited. It’s like giving your browser a short-term memory loss. More importantly, when you use incognito mode, your browser doesn’t use the existing cache but instead starts with a clean slate. This means you can test if caching is the cause of the ERR_HTTP2_PROTOCOL_ERROR without having to clear your cache entirely.
If the site loads successfully in incognito mode, it indicates that the problem might lie with the cached data or installed extensions in your regular browsing mode. This approach helps isolate the issue, letting you know that clearing the cache, cookies, or disabling certain extensions might indeed resolve the issue—without having to resort to that immediately.
To launch a window in incognito mode:
- Click on the three-dot menu icon at the top-right corner of your Google Chrome browser.
- Select “New Incognito Window” from the dropdown menu. You can also press Ctrl+Shift+N (or Cmd+Shift+N on Mac) as a shortcut to open a new incognito window directly.
- In the newly opened incognito window, try visiting the website where you encountered the ERR_HTTP2_PROTOCOL_ERROR.
Deactivate browser extensions
Extensions add functionality to your browser but can also unintentionally mess with web page loading processes or modify important headers that are part of the HTTP/2 protocol. This interference can lead to errors when the browser tries to communicate with a server that’s expecting information in a specific format or through certain procedures that the extension alters or blocks.
Disabling extensions in Google Chrome
Disabling extensions in Google Chrome is straightforward and can help pinpoint whether an extension is causing your ERR_HTTP2_PROTOCOL_ERROR. Here’s how:
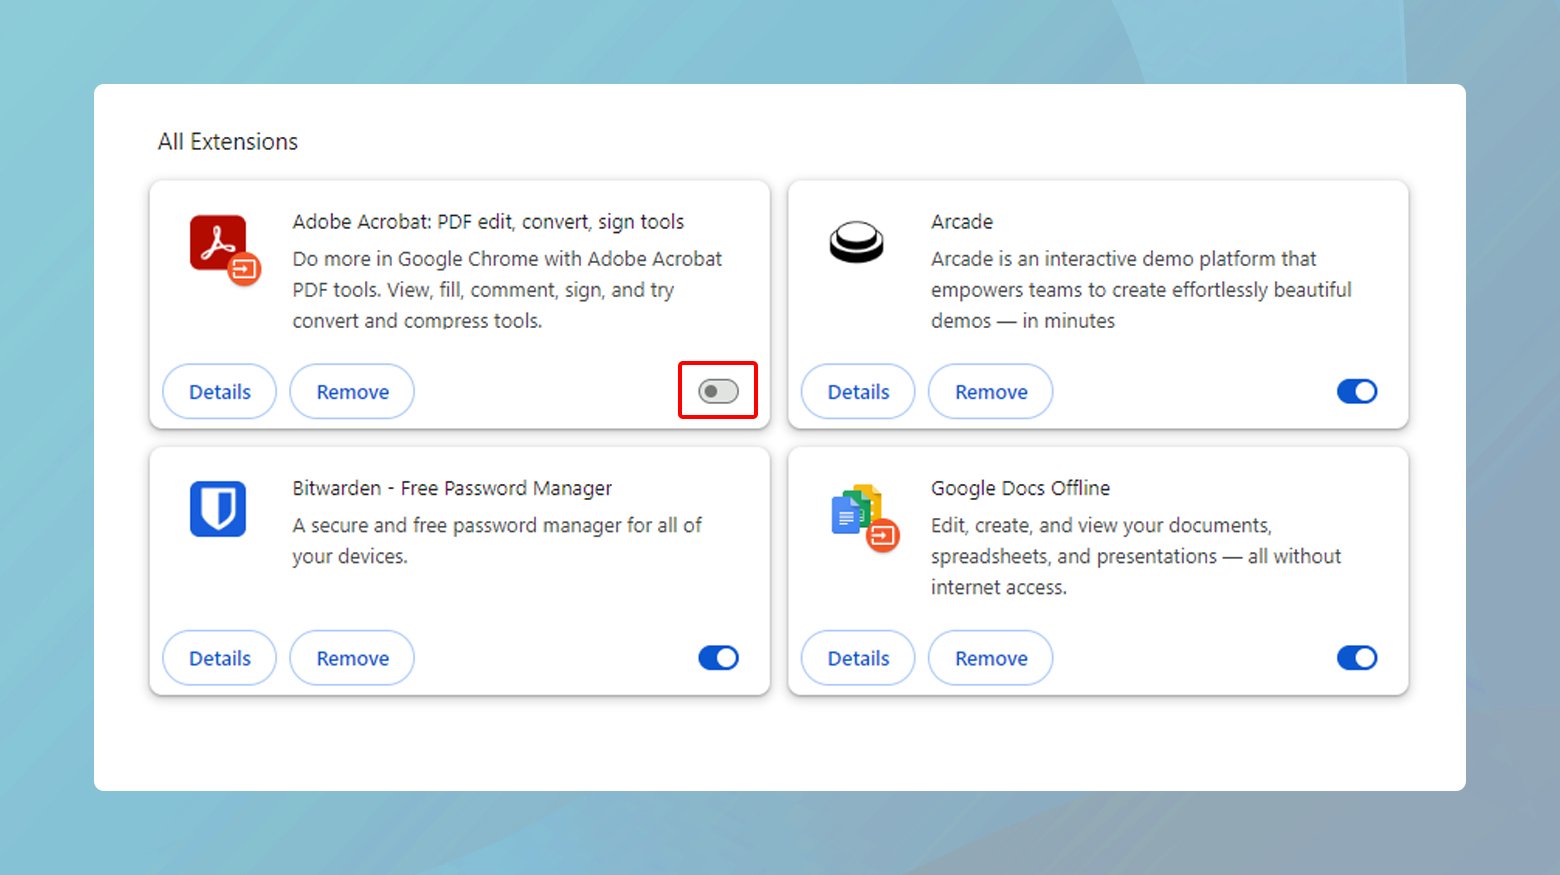
- Open Google Chrome and click on the three-dot menu in the upper right corner.
- Navigate to More Tools > Extensions. This action will open a new page listing all the extensions you’ve installed in Chrome.
- You’ll see a switch at the bottom-right corner of each extension box. Click these switches to turn off each extension. Turning off an extension doesn’t remove it; it simply deactivates it temporarily.
With all extensions turned off, try accessing the web page where you encountered the ERR_HTTP2_PROTOCOL_ERROR. If the page loads without issue, congratulations, you’ve narrowed down the problem to one (or more) of your extensions!
To find the problematic extension:
- Return to the Extensions page in Chrome.
- Reactivate each extension one by one, ensuring you test the website after enabling each. This step is crucial for identifying which extension is causing the conflict.
When the error reappears after turning an extension back on, you’ve found the extension causing the error.
After identifying the extension causing the error, you have a few options:
Remove the extension: If it’s not essential to your browsing experience, you might opt to remove it altogether. Just click “Remove” on the extension’s box in the Chrome Extensions page.
Check for updates: Sometimes, the issue is known to the developers, and an update could resolve it. Look for an Update button in the Extensions page or visit the extension’s page in the Chrome Web Store to see if a newer version is available.
Contact the developer: If the extension is crucial for your workflow, consider reaching out to the developer. Reporting the issue can help them identify and fix the conflict with the HTTP/2 protocol.
Disable the QUICK protocol
QUIC aims to improve upon the older protocols by reducing connection establishment time, improving congestion control, and providing better security through encryption. While these goals are admirable, the reality is that only a fraction of websites have configured their servers to handle QUIC traffic. This gap in protocol support can lead to incompatibilities between your browser (the client) and the web server, manifesting as ERR_HTTP2_PROTOCOL_ERROR.
The idea behind disabling QUIC in your browser is to force it to fall back on the more widely supported HTTP/2 or even HTTP/1.1 protocols, thereby sidestepping the compatibility issue. It’s a bit like switching to a more commonly spoken language when you find out your first choice isn’t understood.
Steps to disable QUIC in Google Chrome
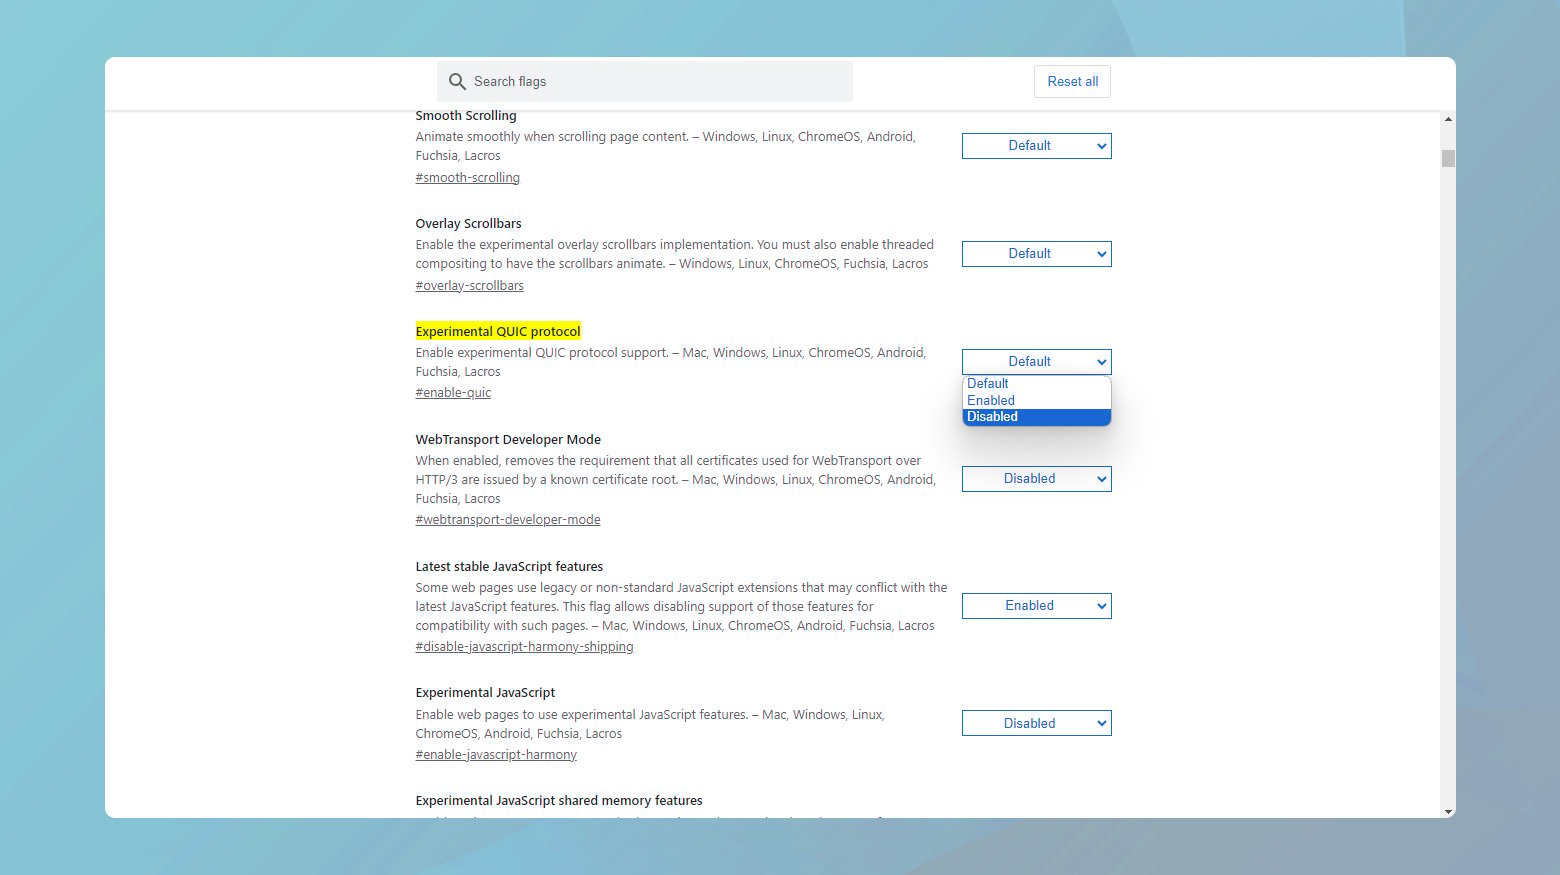
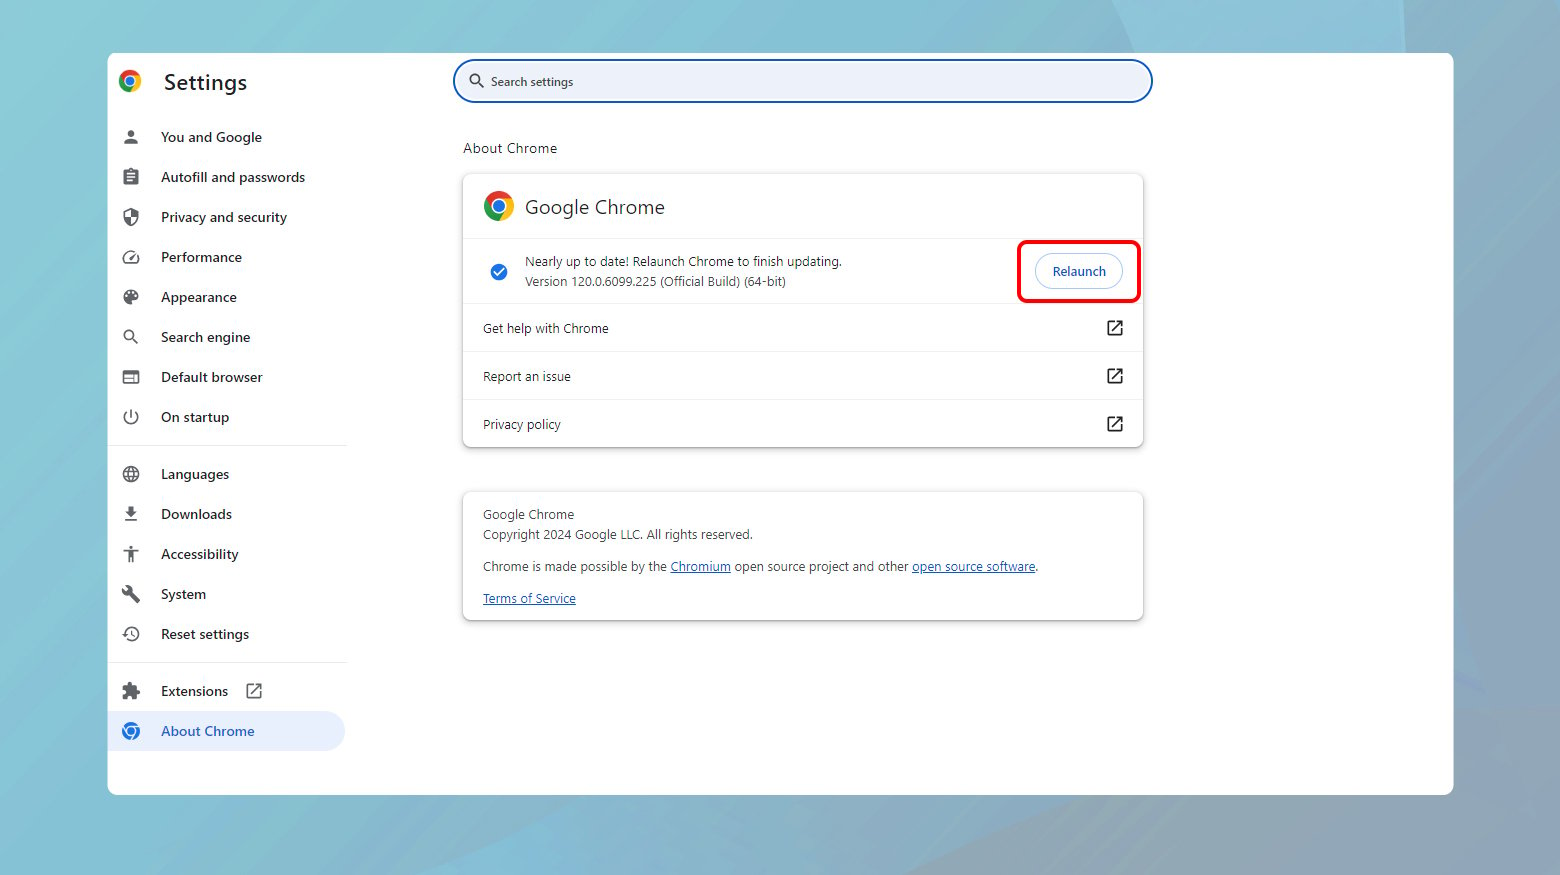
- Launch Google Chrome and type chrome://flags/#enable-quic into the address bar. This will take you directly to Chrome’s experimental features related to QUIC.
- You should see the Experimental QUIC protocol setting highlighted. It might be set to Default or Enabled.
- Click the dropdown menu next to this setting and change it to Disabled.
- After making this change, Chrome will prompt you to relaunch the browser to apply the settings. Click the Relaunch button to do so.
Disabling QUIC forces your browser to use older, more stable protocols when establishing connections to web servers.
It’s important to note that disabling QUIC is more of a workaround than a permanent solution. As web technologies evolve and QUIC adoption becomes more widespread, you may eventually want to re-enable QUIC to take advantage of its benefits. Additionally, if you find that disabling QUIC resolves your issue, it might be worth reporting the compatibility problem to the website owner. They may need to update their server configurations to better support modern protocols.
Reset browser to default state
Google Chrome, like any sophisticated software, can accumulate glitches or have its settings inadvertently altered over time. These small changes might not be noticeable at first but can lead to significant issues, including the dreaded ERR_HTTP2_PROTOCOL_ERROR. Fortunately, resetting Chrome to its default settings can often clear these issues right up.
Resetting Chrome does more than just clear your browsing history or delete your bookmarks (though it’s important to note that it can do these things, so proceed with caution). It wipes away any changes to settings, extensions, and other customizations you’ve made or that have been made without your knowledge. This clean slate can resolve conflicts or errors caused by misconfigured settings or problematic extensions.
Considerations before resetting
While resetting Chrome can resolve many issues, it’s a significant step that will remove your customizations:
Backup important information: If you have bookmarks, passwords, or other data you don’t want to lose, make sure to back them up or sync them with your Google account.
Extension reinstallation: You’ll need to reinstall any extensions you were using. This can be a good opportunity to evaluate which extensions are truly necessary, as too many can slow down your browser.
How to reset Google Chrome settings
To bring your Chrome back to its original state:
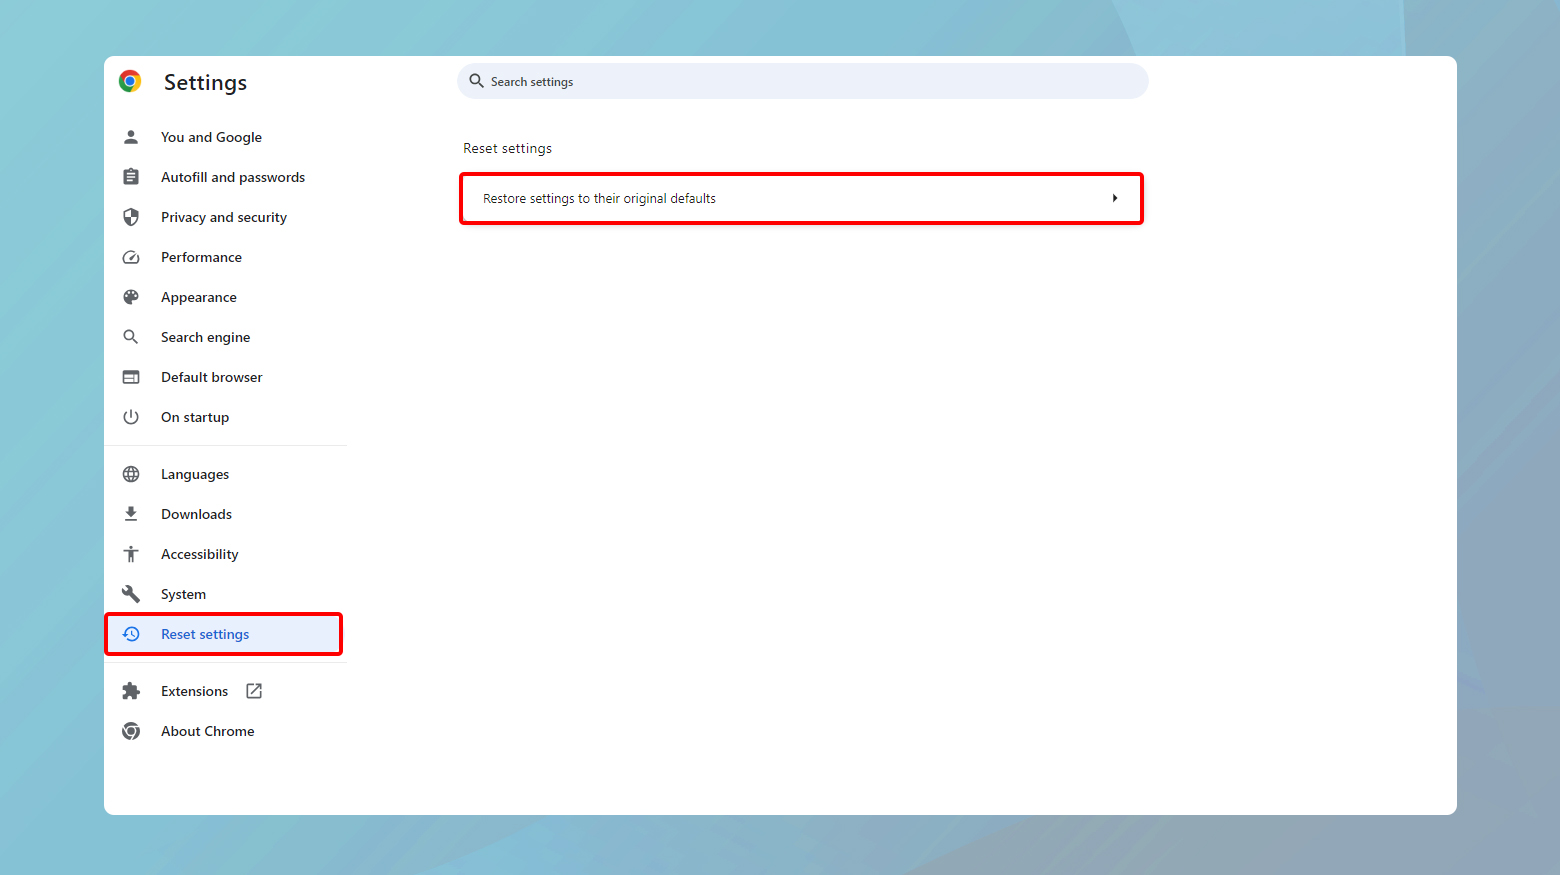
- Click the three dots in the upper right corner of the browser, then select Settings.
- Scroll down and click on Advanced to expand the advanced settings options. Look for the Reset and clean up section on the left sidebar and click on it.
- Here, you’ll find an option that says Restore settings to their original defaults. Click on this option.
Chrome will prompt you to confirm that you want to reset your settings. It will warn you about what data will be erased, such as your search engine preferences, pinned tabs, and extensions. If you’re ready to proceed, click on Reset settings.
Resetting experimental features
In addition to the general settings, Chrome has a page dedicated to experimental features, accessible via chrome://flags/. These features are not part of the stable release and can sometimes cause issues:
To access these features:
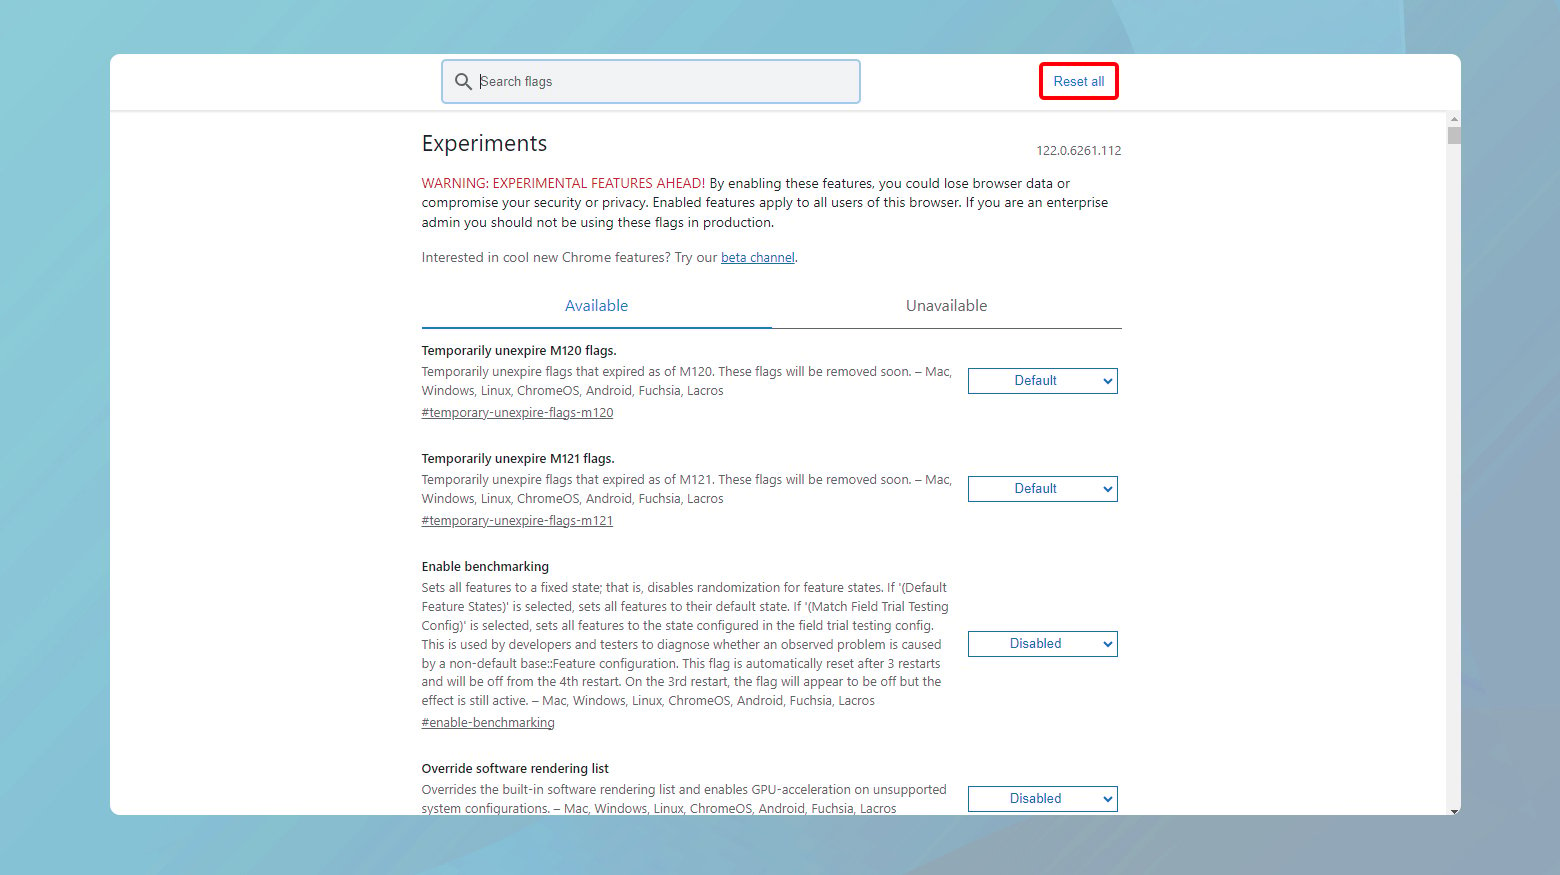
- Enter chrome://flags/ in your Chrome address bar and press Enter.
- At the top of the page, you’ll see a button that says Reset all. Clicking this will revert all experimental features to their default state.
- For the changes to take effect, you’ll need to relaunch your browser. Chrome will typically prompt you to do this after resetting the flags.
Reinstall Chrome
If you’ve tirelessly tried every method under the sun—from clearing your cache to disabling extensions, reinstalling Chrome can address issues that are deep-rooted within the application itself—problems that aren’t fixed through settings adjustments or updates. This process removes any corrupted files and reinstalls a clean, updated version of Chrome, potentially flushing out the bug causing the ERR_HTTP2_PROTOCOL_ERROR.
Before you begin
Reinstalling Chrome comes at the cost of losing your browser data, including bookmarks, history, and saved passwords, unless you’ve synced them with your Google Account. Here are a few tips before you proceed:
Backup important data: Ensure any important information is backed up. If you’re signed into Chrome with your Google account, much of your data will be synced and can be restored after reinstallation.
Note down extensions: Make a list of the extensions you use, as you’ll need to reinstall these manually after reinstalling Chrome.
Uninstalling Google Chrome
Windows

- Click on the Windows Start button and search for the Control Panel, then open it.
- Under the Programs section, find and click on Uninstall a Program.
- Scroll through the list of installed programs until you find Google Chrome. Right-click on it and select Uninstall. Follow the prompts to complete the uninstallation.
macOS
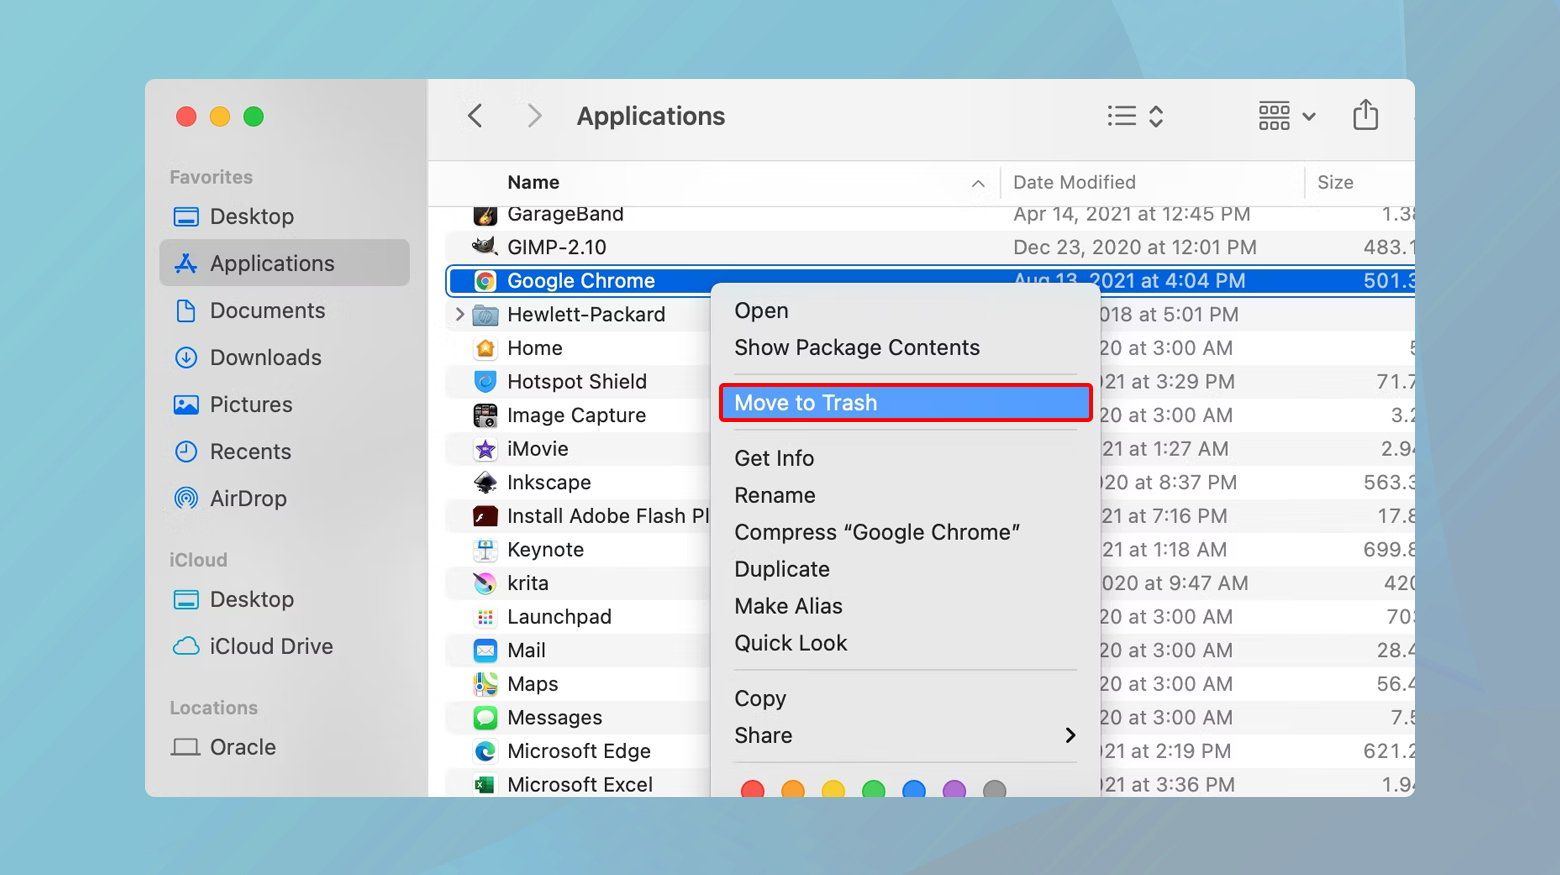
- Open the Finder and navigate to the Applications folder. Find Google Chrome, click and hold it, then drag it to the Trash (or right-click and select “Move to Trash”).
- Open Finder again and in the menu bar, select Go > Go to Folder. Type ~/Library/Google and press Enter. Locate the GoogleSoftwareUpdate folder and delete it by moving it to the Trash.
Reinstalling Chrome
After you’ve successfully uninstalled Chrome, reinstalling it is straightforward:
- Visit the official Google Chrome website using another browser. Download the Chrome installer.
- Open the downloaded file and follow the on-screen instructions to install Chrome on your device.
Device and network solutions
We have looked at how to resolve the ERR_HTTP2_PROTOCOL_ERROR in the browser. However The source of the error is not always the browser. Here are some device and network troubleshooting solutions.
Check device date and time
Believe it or not, something as simple as having the wrong date and time set on your device can lead to perplexing issues like the ERR_HTTP2_PROTOCOL_ERROR. Each time your device communicates with a web server (for example, when you’re accessing a website), it sends and receives data packets stamped with the current date and time. These timestamps help in managing secure connections and ensuring data integrity. If your device’s clock is out of sync, the server might reject these packets, fearing a security risk. This mismatch can lead to various errors, including the ERR_HTTP2_PROTOCOL_ERROR, as it disrupts the smooth communication flow that HTTP/2 protocol aims to establish.
Windows
For Windows users, making sure your device is on the right track time-wise is straightforward:
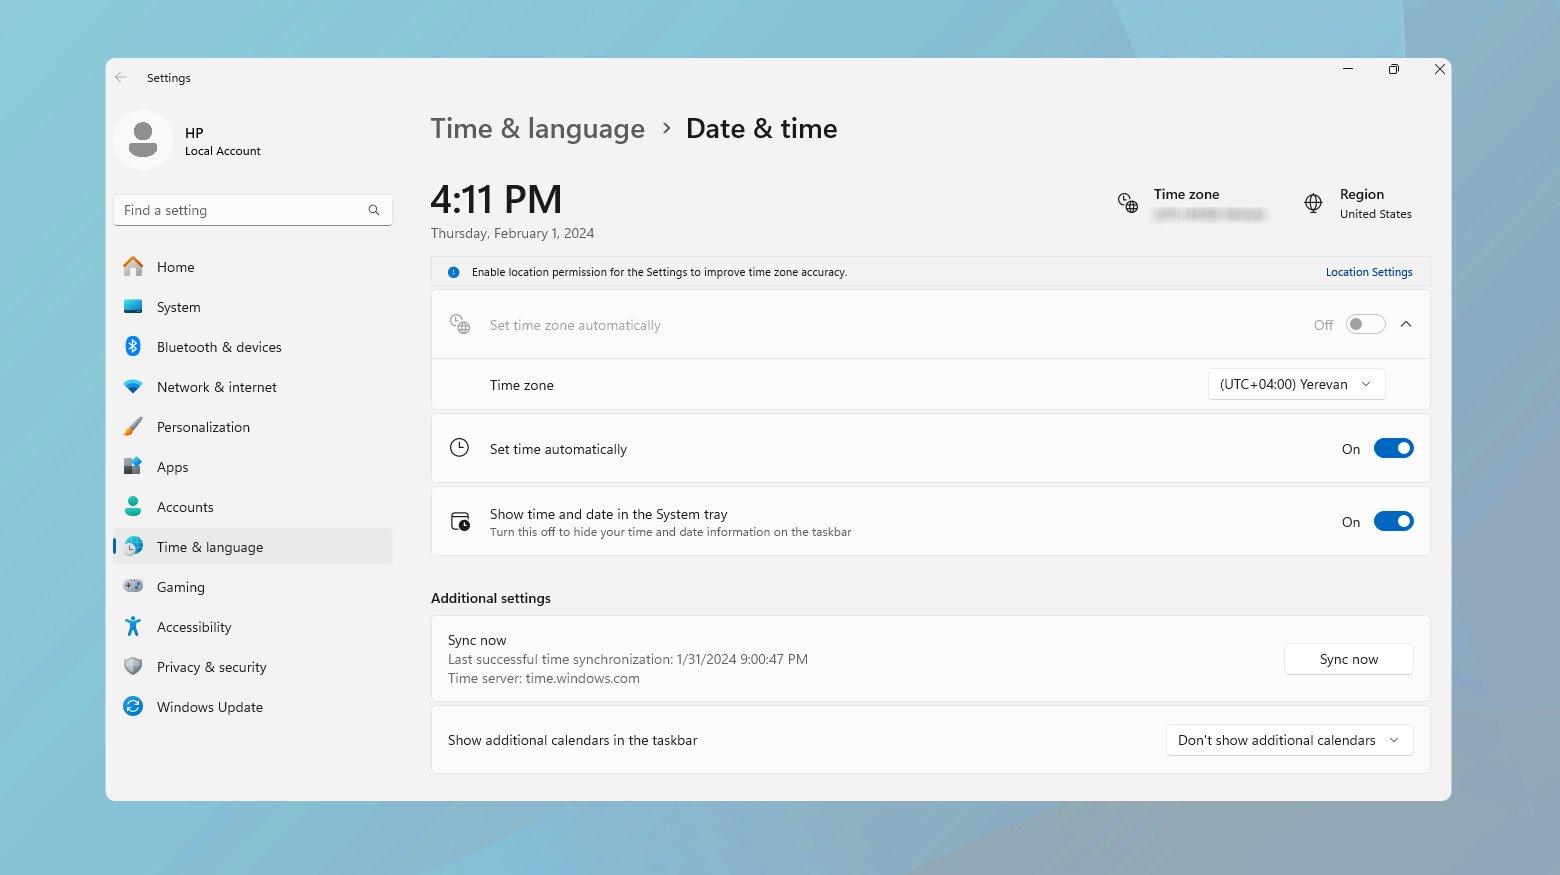
- Right-click on the clock in the bottom-right corner of your desktop and select Adjust date/time.
- If the Set time automatically option is enabled but displaying the wrong time, toggle it off.
- Ensure the Time zone setting matches your current location.
- Click on Change under Set the date and time manually. In the pop-up window, adjust the date and time to the correct values.
Mac
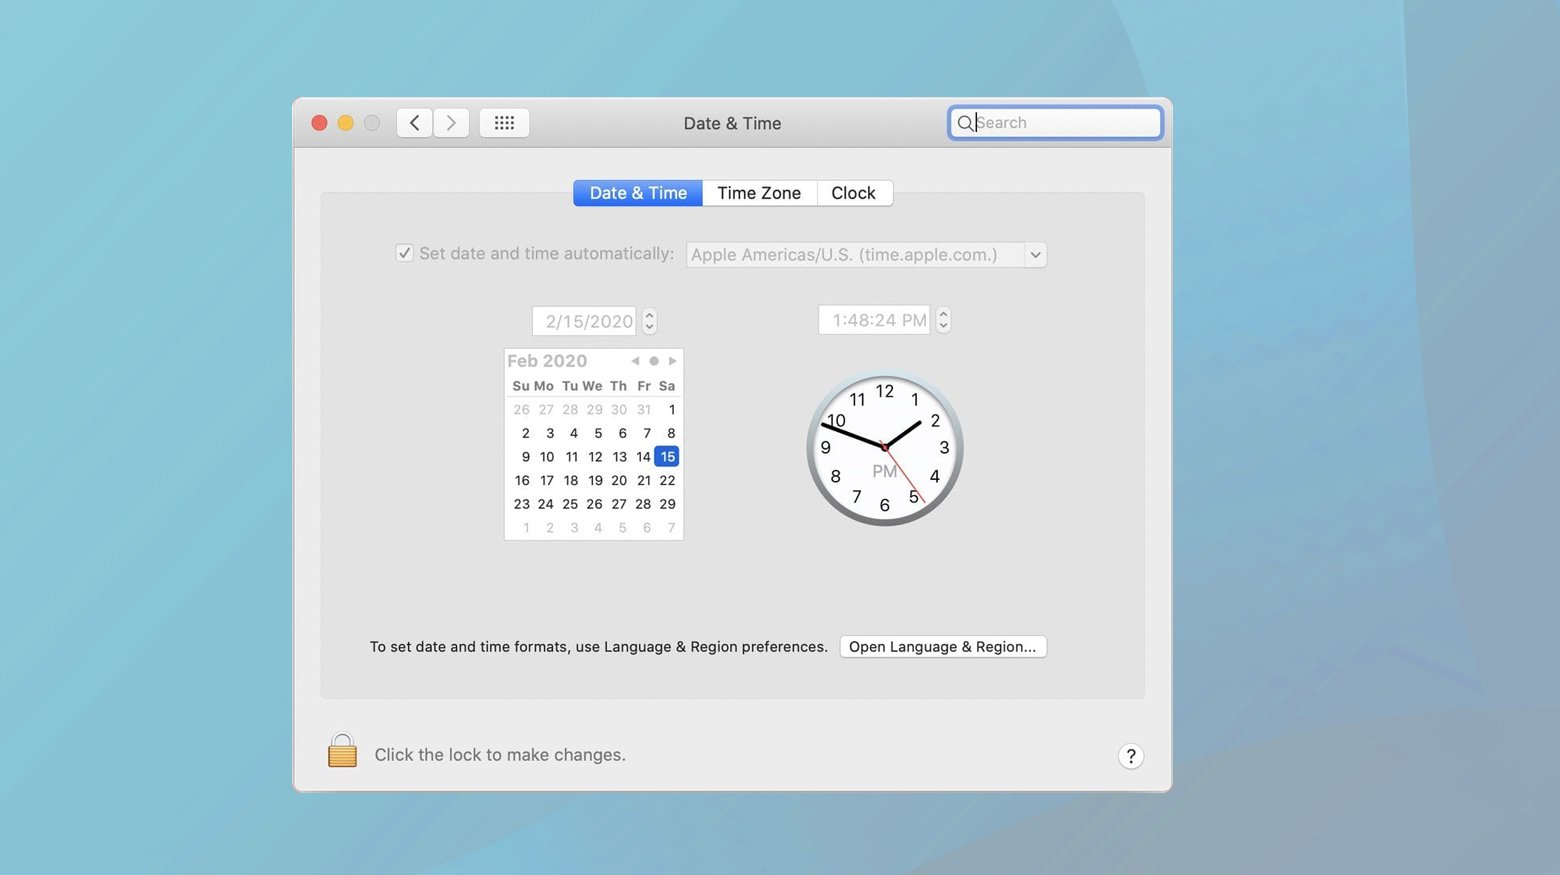
Mac users can also easily adjust their system’s date and time settings:
- Click on the Apple menu and select System Preferences.
- Click on Date & Time.
- Click the lock icon in the bottom-left corner to enable changes (you may need to enter your password).
- Uncheck Set date and time automatically and manually input the correct date and time.
Once you’ve corrected your device’s date and time, give your web browser another go. Try accessing the webpage where you encountered the ERR_HTTP2_PROTOCOL_ERROR.
Keeping your device updated
Whether you’re on macOS or Windows, keeping your operating system updated is crucial for ensuring compatibility with the latest web technologies, including the HTTP/2 protocol. Operating system updates play a pivotal role in maintaining the harmony between your device and the ever-evolving web. They ensure that your system’s software can effectively communicate with new and updated websites, preventing conflicts that might result in errors. Regular updates also enhance security, making it harder for malicious entities to exploit vulnerabilities.
macOS
Before you dive into updating your macOS, it’s wise to perform a backup to safeguard your data. This can be done using Time Machine or your preferred backup method. Once your data is secure, follow these steps to update your macOS:
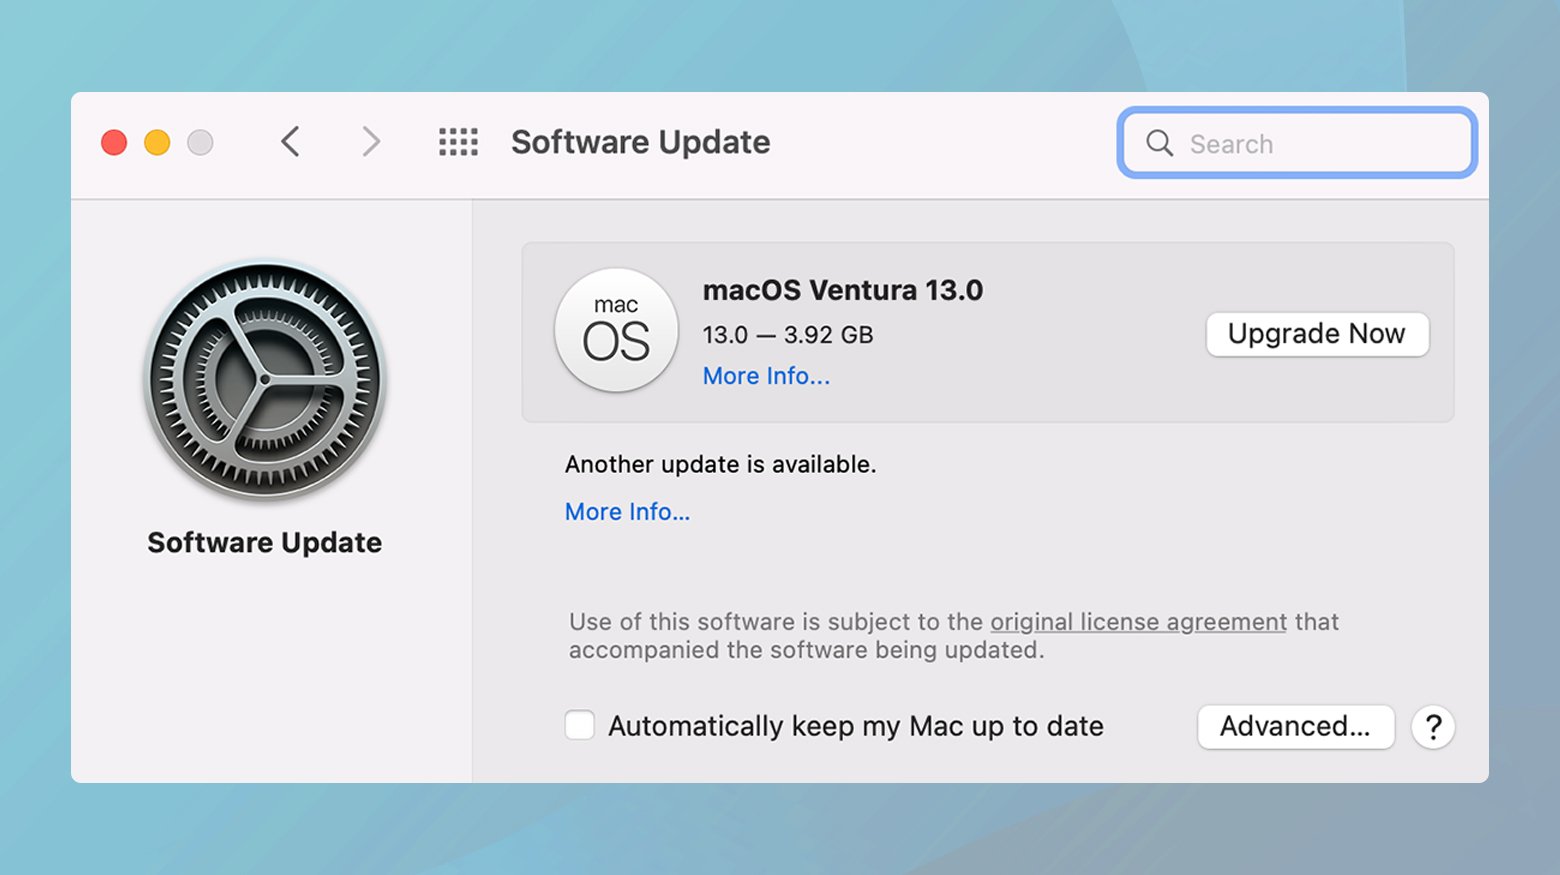
- Click on the Apple menu in the top-left corner of your screen and select System Preferences.
- From there, find and click on Software Update.
- If updates are available, you’ll see them listed in this window. Click on Update Now to start the installation process. Your Mac may need to restart, so be prepared to save any work and close applications before proceeding.
Windows
Windows also frequently releases updates to improve performance and security. Here’s how you can ensure your Windows device is up-to-date:
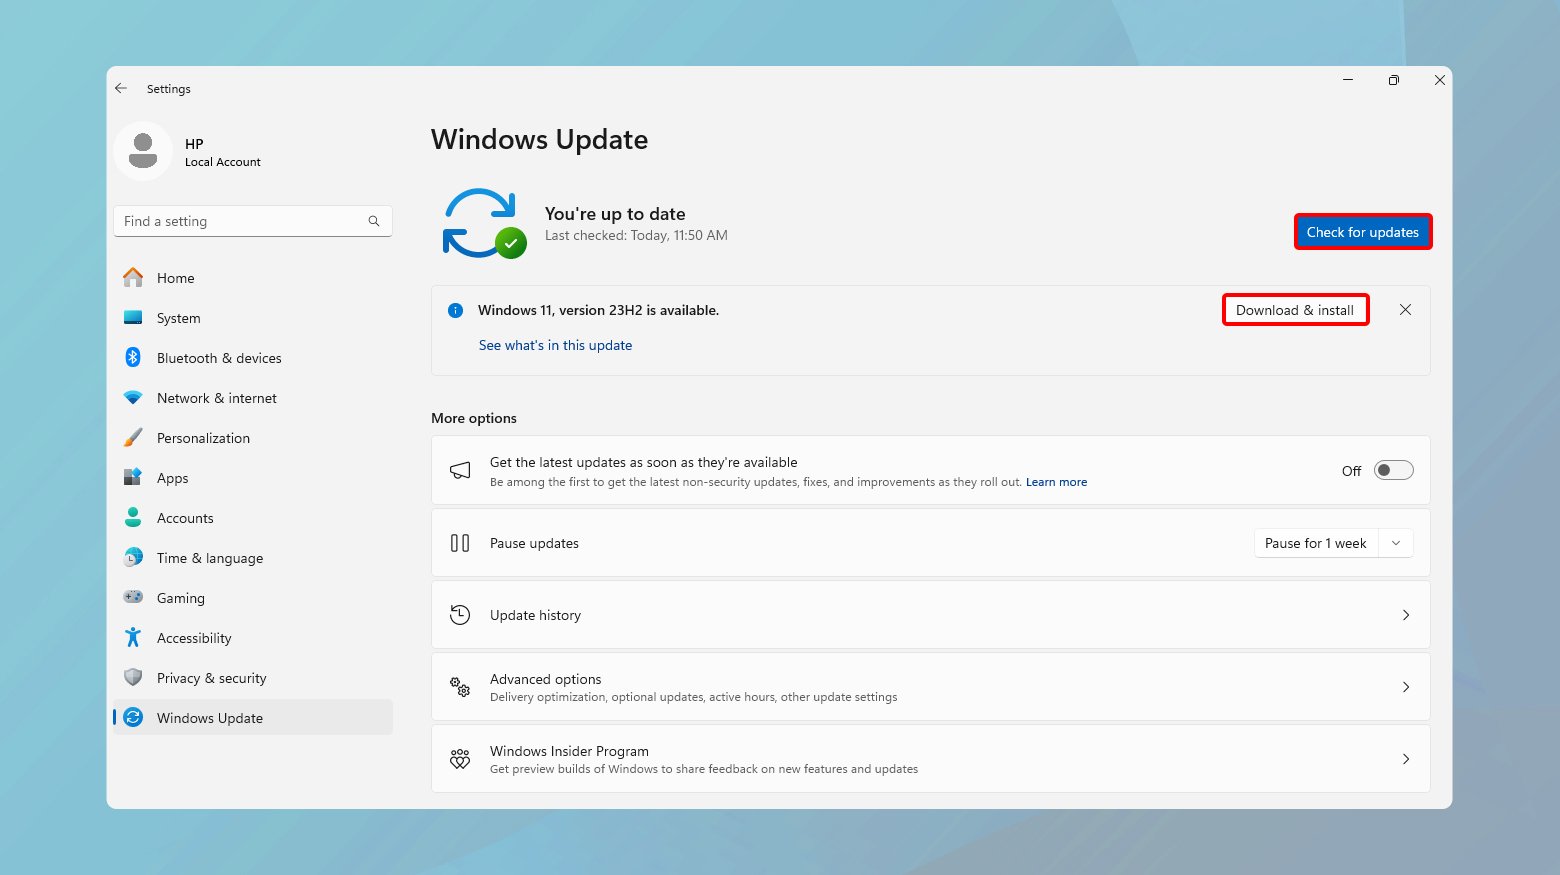
- Click on the Start menu and go to Settings > Update & Security > Windows Update.
- Click on Check for updates to see if any are available. If there are, they will be downloaded automatically, and you’ll be prompted to install them. Again, be ready for your device to restart during this process.
Once your device is updated, it’s time to revisit the website where you encountered the ERR_HTTP2_PROTOCOL_ERROR. With the latest updates installed, your operating system should now be fully compatible with current web standards, including those necessary for smooth HTTP/2 communication.
Flushing DNS cache
DNS acts as the internet’s phone book, translating human-friendly website names into IP addresses that computers use to communicate. Over time, your device stores (or “caches”) this DNS data to speed up future access to websites. However, if this cached data becomes outdated or corrupted, it might lead to errors like the one you’re facing.
Flushing the DNS cache removes all saved DNS lookup information, forcing your computer to retrieve fresh data the next time you try to access a website. This process can resolve discrepancies or errors that occur when your cached DNS data doesn’t match the current details of the website you’re trying to visit.
macOS
For users running macOS, the Terminal provides a direct way to refresh your DNS cache:
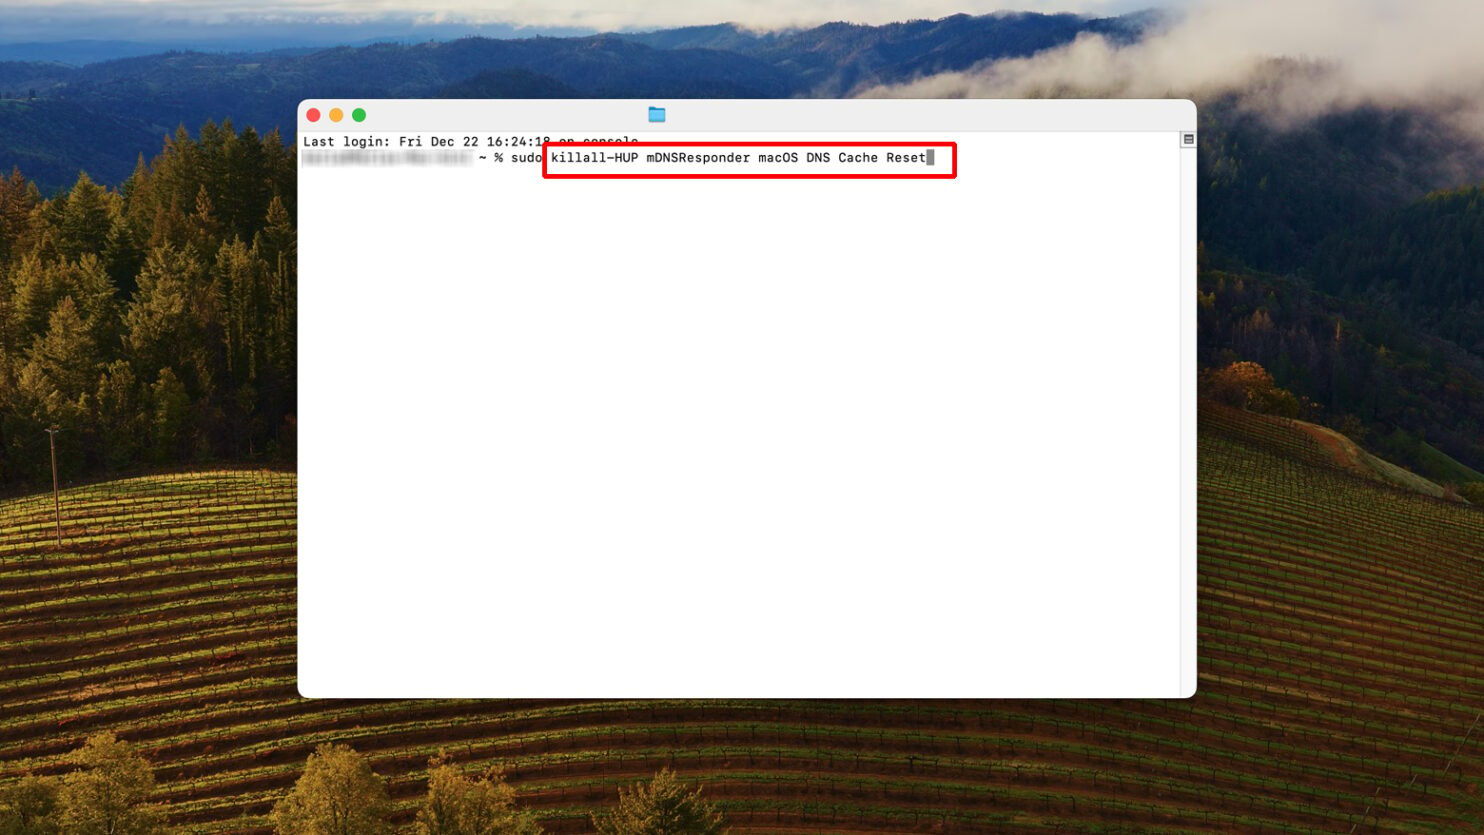
- You can find Terminal in the Utilities folder, which is located in the Applications folder. Alternatively, use Spotlight (Cmd + Space) and type Terminal.
- Type the following command into the Terminal window:
sudo killall -HUP mDNSResponder
This command tells the system to restart the DNS service by sending a Hang Up signal to the mDNSResponder process, effectively clearing the cache.
You’ll likely be prompted to enter your administrator password to authorize the command. Type it in, and press Enter. You won’t see the characters as you type, which is normal for Terminal.
The command to flush the DNS cache may differ depending on your macOS version. It’s worth looking up the specific command for your macOS version if the above command doesn’t work. Each major version of macOS has its nuances when it comes to managing the DNS cache.
Windows
Windows users can flush their DNS cache through the Command Prompt with a simple command:
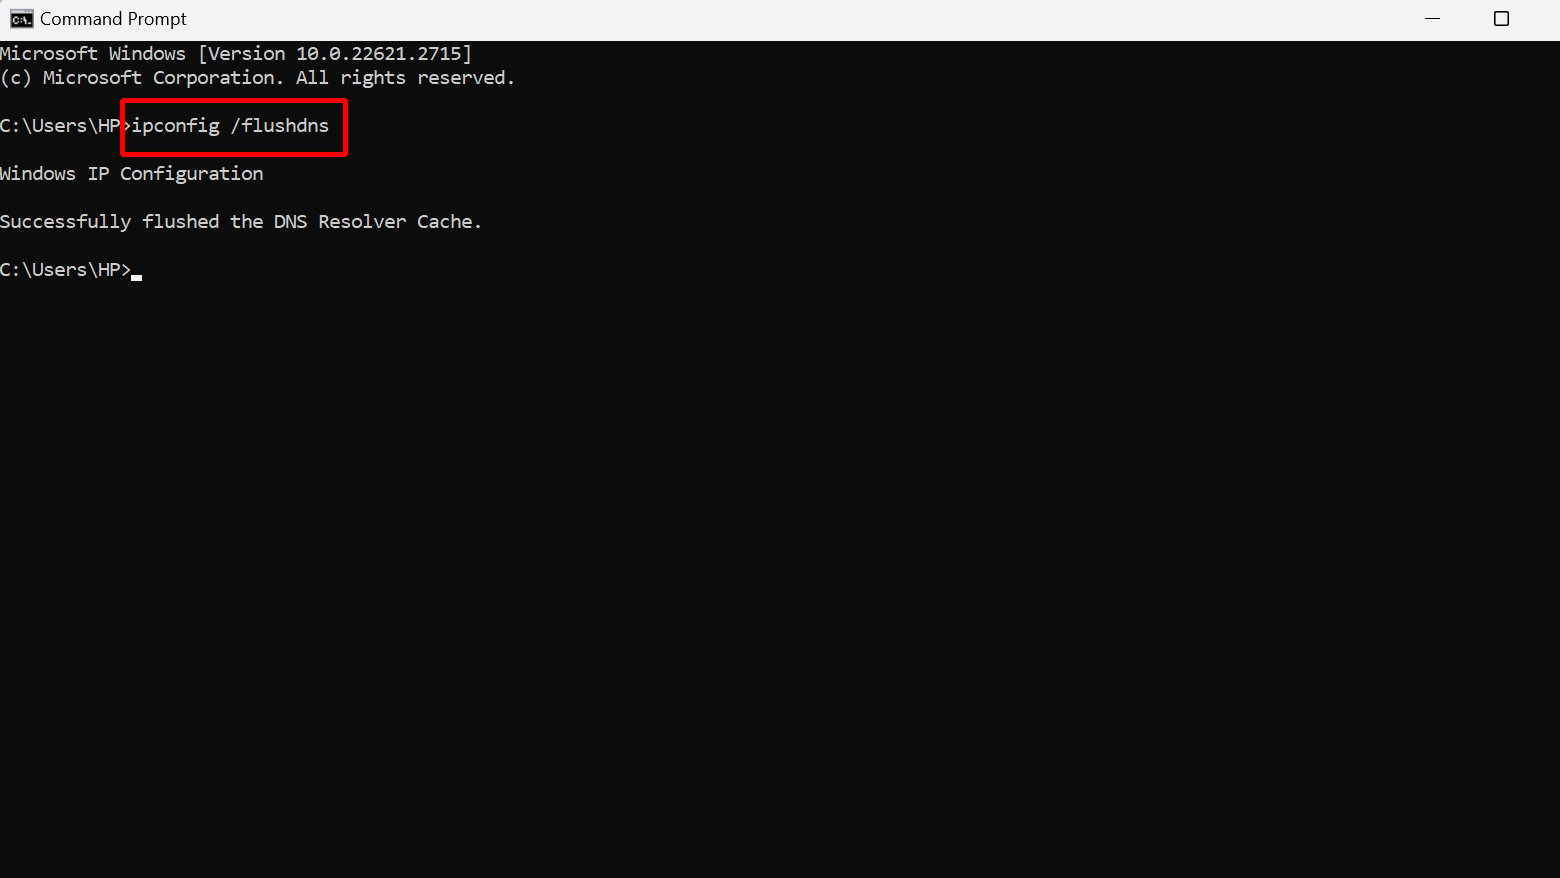
- Press the Windows key, type cmd, and hit Enter. You don’t need to run it as an administrator for this task.
- In the Command Prompt window, type the following command and press Enter:
ipconfig /flushdns
If the flush was successful, you’ll see a message stating, Successfully flushed the DNS Resolver Cache.
After flushing your DNS cache, try accessing the webpage that previously displayed the ERR_HTTP2_PROTOCOL_ERROR. In many cases, this refreshes the connection, allowing your browser to communicate effectively with the website.
Balancing security and access
Antivirus software uses a complex set of rules and databases to identify potential threats. While this is overwhelmingly beneficial, it can occasionally misinterpret the behavior of legitimate websites or applications as malicious. This proactive stance can lead to false positives, where non-threatening entities are flagged or blocked, potentially leading to errors like ERR_HTTP2_PROTOCOL_ERROR when trying to access certain sites.
Checking your antivirus notifications and quarantine list
To determine if your antivirus is the source of your browsing woes, start by investigating its notifications and quarantine list:
- Most antivirus programs will alert you to potential threats and actions through notifications. Accessing these will vary depending on your software, but they’re often found within the antivirus application itself or through your computer’s notification area.
- The quarantine list is a holding area for files and programs your antivirus has flagged as suspicious. Within your antivirus application, look for a section labeled something like Quarantine or Detected Threats. Here, you’ll find items the software has restricted.
What to do if legitimate applications are flagged
If you spot a website or application you trust being flagged by your antivirus, you have a couple of options:
- If you’re confident the site or application is safe, consider temporarily disabling your antivirus to access it. However, proceed with caution—ensure you’re absolutely sure about the safety of what you’re accessing. To disable your antivirus, look for an option within the software’s settings. Remember to re-enable protection as soon as possible.
- A more secure option is to whitelist (or exclude) the specific site or application within your antivirus settings. This tells your antivirus to trust and allow future activities related to it. The process for whitelisting varies by software, so consult your antivirus help documentation for precise instructions.
While adjusting your antivirus settings can resolve access issues, it’s vital to tread carefully. The internet is rife with genuine threats, and your antivirus is a critical defense line. Any adjustments to its operation should be made judiciously, with a clear understanding of the potential risks involved.
Closing thoughts
Throughout our blog, we navigated various strategies to troubleshoot and potentially resolve the ERR_HTTP2_PROTOCOL_ERROR. Starting with simple fixes like refreshing the page and updating your browser, we delved into more technical solutions, including clearing cache and cookies, disabling extensions, and even adjusting system-level settings like the date and time. We also explored network-related adjustments such as flushing the DNS cache and ensuring system compatibility through updates. Recognizing the potential impact of antivirus software on web access, we concluded with advice on balancing security measures with the need for unrestricted access to websites. This journey underscores the multifaceted nature of web browsing issues and highlights the importance of a systematic approach to troubleshooting, emphasizing the balance between security and functionality in the digital realm.
Accelerate your WordPress website creation with AI
Create a custom WordPress website tailored to your business needs 10X faster with 10Web AI Website Builder.


